[Docker] 간단한 React App 배포 해보기
📌 Topic
- 섹션 설명
- 리액트 앱 설치하기
- 도커를 이용하여 리액트 앱 실행하기
- 생성된 도커 이미지로 리액트 앱 실행해보기
- 도커 볼륨을 이용한 소스 코드 변경
- 도커 컴포즈로 좀 더 간단하게 앱 실행해보기
- 리액트 앱 테스트하기
- 운영환경을 위한 Nginx
- 운영환경 도커 이미지를 위한 Dockerfile 작성하기
01. 섹션 설명
01-1. 해당 섹션 설명
- 어플리케이션의 처음부터 배포까지 진행
- 단일 컨테이너 어플리케이션 실습
- 멀티 컨테이너 어플리케이션 실습
02. 리액트 앱 설치하기
02-1. 리액트 앱 설치를 위해 node 설치
$ node -v
v16.13.1
node -v 명령어를 통해 node.js 설치 여부를 확인 한다.
만약 설치가 되어있지 않은 경우 해당 링크를 참고하자.
02-2. node 설치 후 리액트 설치 진행
# install react
npx create-react-app react-app
02-3. react 설치 후 실행
# run react
npm run start
02-4. react application 테스트
# test react
npm run test
02-5. react application build
# build react app
npm run build
03. 도커를 이용하여 리액트 앱 실행하기
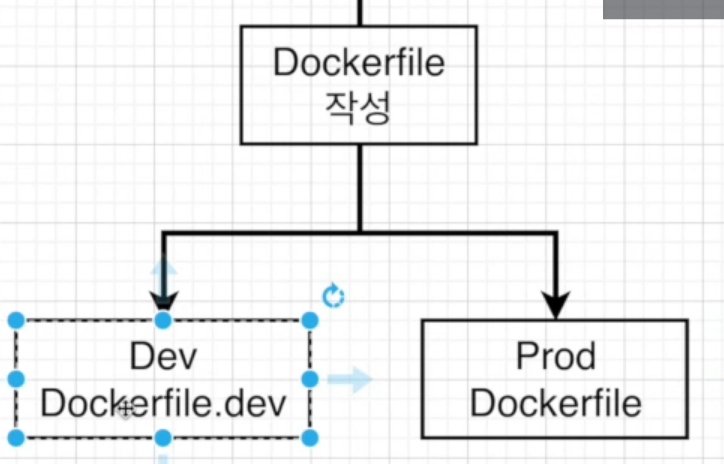
03-1. 도커 파일도 개발 환경에 따라 구분이 가능하다

개발 환경에 따라서 Dockerfile을 구분하여 생성한다.
즉, Dockerfile.dev, Dockerfile.prod와 같이 생성.
03-2. 개발 환경에 따른 Dockerfile 작성
# Dockerfile.dev
FROM node:alpine

WORKDIR /usr/src/app

COPY package.json ./

RUN npm install

COPY ./ ./

CMD ["npm", "run", "start"]
Dockerfile을 작성하였으니 이제 해당 Dockerfile을 빌드 해보자.
Dockerfile을 빌드하게 되면, 아래와 같은 에러가 발생할 것이다.
$ docker build -t docker-react-app ./
unable to prepare context: unable to evaluate symlinks in Dockerfile
path: CreateFile C:\Users\ymkim\OneDrive\바탕 화면\도커와_CI환경\docker-react-app\Dockerfile:
The system cannot find the file specified.
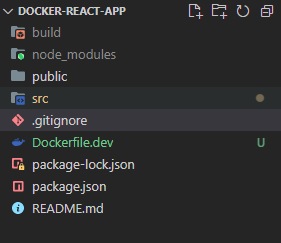
위와 같은 에러가 발생하는 이유는 Dockerfile을 찾지 못했기 때문이다.
즉, 위에서 작성한 Dockerfile은 Dockerfile.dev로 작성이 되었고 이름이 다르기에
Dockerfile을 찾지 못했다는 에러가 나오는 것이다.
이러한 문제를 해결하기 위해서는 임의의 option을 줘서 docker에게
이미지를 빌드할 때 참조할 파일명을 알려주면 된다.
docker build -f Dockerfile.dev .
Sending build context to Docker daemon  303.2MB
Step 1/6 : FROM node:alpine
alpine: Pulling from library/node
2408cc74d12b: Already exists
32ed809bf2a7: Pull complete
73c211c795d8: Pull complete
d23212106752: Pull complete
Digest: sha256:e479d86de1ef8403adda6800733a7f8d18df4f3c1c2e68ba3e2bc05fdea9de20
Status: Downloaded newer image for node:alpine
 ---> c523bf998f42
Step 2/6 : WORKDIR /usr/src/app
 ---> Running in a8f7f4f98498
Removing intermediate container a8f7f4f98498
 ---> aa4e00e62b64
Step 3/6 : COPY package.json ./
 ---> a951c7ecbf93
Step 4/6 : RUN npm install
 ---> Running in 857a66ad9309
npm WARN deprecated stable@0.1.8: Modern JS already guarantees Array#sort() is a stable sort, so this library is deprecated. See the compatibility table on MDN: https://developer.mozilla.org/en-US/docs/Web/JavaScript/Reference/Global_Objects/Array/sort#browser_compatibility
npm WARN deprecated svgo@1.3.2: This SVGO version is no longer supported. Upgrade to v2.x.x.
npm WARN deprecated source-map-resolve@0.6.0: See https://github.com/lydell/source-map-resolve#deprecated

added 1285 packages, and audited 1286 packages in 1m

203 packages are looking for funding
  run `npm fund` for details

6 high severity vulnerabilities

To address all issues (including breaking changes), run:
  npm audit fix --force

Run `npm audit` for details.
npm notice
npm notice New minor version of npm available! 8.12.1 -> 8.13.2
npm notice Changelog: <https://github.com/npm/cli/releases/tag/v8.13.2>
npm notice Run `npm install -g npm@8.13.2` to update!
npm notice
Removing intermediate container 857a66ad9309
 ---> 8ece8c3debd6
Step 5/6 : COPY ./ ./
 ---> c1109d40abb8
Step 6/6 : CMD ["npm", "run", "start"]
 ---> Running in 662b8473b861
Removing intermediate container 662b8473b861
 ---> 57a38950482a
Successfully built 57a38950482a
SECURITY WARNING: You are building a Docker image from Windows against a non-Windows Docker host. All files and directories added to build context will have '-rwxr-xr-x' permissions. It is recommended to double check and reset permissions for sensitive files and directories.

Use 'docker scan' to run Snyk tests against images to find vulnerabilities and learn how to fix them
위 명령어를 통해서 Dockerfile.dev 파일을 빌드 할 수 있다.
03-2. node_modules 파일 삭제

현재 로컬에는 node_modules가 존재한다.
해당 파일은 Dockerfile이 빌드될 때 npm install 커멘드를 통해 컨테이너에 생성이 된다.
그러므로 Docker 환경에서 react app을 사용할 경우에는 해당 파일을 삭제 해주자.
04. 생성된 도커 이미지로 리액트 앱 실행해보기
04-1. 리액트 앱 실행
docker run -d youngmin1085/docker-react-app
04-2. 리액트 앱 포트 포워딩 진행
# -it 옵션을 사용하지 않으면 react app이 제대로 올라가지 않으니 필수적으로 사용
docker run -it -d -p 3000:3000 youngmin1085/docker-react-app
로컬에서 컨테이너에 접근하기 위해 포트 포워딩 사용.
Client Port가 3000, Container Port 역시 3000번 이다.
04-3. localhost:3000번 접속 후 화면

Docker 이미지를 빌드후 구동까지 하게되면 위와 같은 화면을 확인 할 수 있다.
05. 도커 볼륨을 이용한 소스 코드 변경
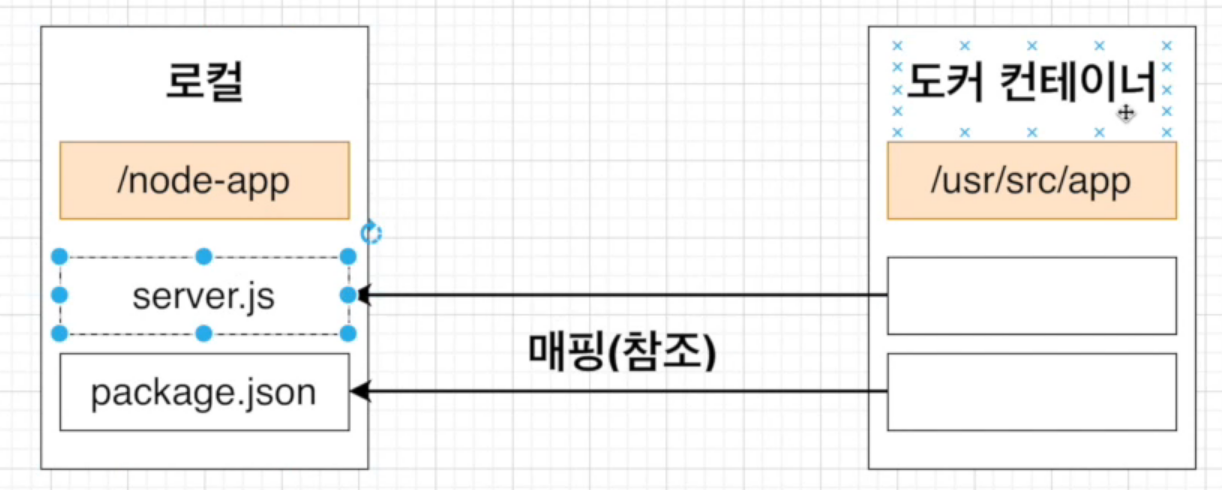
05-1. Copy와 Volume의 차이

COPY는 로컬에 있는 파일을 도커 컨테이너에 복사하는 개념이다.

VOLUME은 도커 컨테이너에서 로컬 머신에 있는 파일과 매핑시켜
참조를 하여 도커 컨테이너에서 실행하는 개념이다.
또한 참조를 위해서는 로컬에 참조를 필요로 하는 파일이
존재해야 참조가 가능하다.
05-2. Volume 사용
docker run -it -p 3000:3000 -v /usr/src/app/node_modules -v ${pwd}:/usr/src/app youngmin1085/docker-react-app
OS 환경에 따라 해당 명령어는 달라질 수 있음.
06. 도커 컴포즈로 좀 더 간단하게 앱 실행해보기
06-1. 간단하게 앱 실행해보기
이전에 리액트 앱을 실행 시키기 위해 사용했던 명령어가 너무나도 길었다.
이번에는 이러한 명령어를 줄일 수 있도록 Docker Compose를 사용해보자.
06-2. docker-compose-yml 작성
version: "3" # docker compose 버전 기재
services: # 실행하려는 컨테이너 정의
  react: # 컨테이너 이름
    build: # 현 디렉토리의 Dockerfile 사용
      context: . # 도커 이미지를 구성하기 위한 파일과 폴더들의 위치
      dockerfile: Dockerfile.dev # 도커 파일 지정
    ports:
      - "3000:3000"
    volumes:
      - /usr/src/app/node_modules
      - ./:/usr/src/app
    environment:
      - CHOKIDAR_USEPOLLING=true
    stdin_open: true
$ docker compose up
[+] Building 83.3s (10/10) FINISHED
 => [internal] load build definition from Dockerfile.dev                                      0.0s
 => => transferring dockerfile: 203B                                                          0.0s
 => [internal] load .dockerignore                                                             0.0s
 => => transferring context: 2B                                                               0.0s
 => [internal] load metadata for docker.io/library/node:alpine                                0.0s
 => [1/5] FROM docker.io/library/node:alpine                                                  0.2s
 => [internal] load build context                                                             0.2s
 => => transferring context: 2.15MB                                                           0.1s
 => [2/5] WORKDIR /usr/src/app                                                                0.1s
 => [3/5] COPY package.json ./                                                                0.1s
 => [4/5] RUN npm install                                                                    78.6s
 => [5/5] COPY ./ ./                                                                          0.0s
 => exporting to image                                                                        4.2s
 => => exporting layers                                                                       4.2s
 => => writing image sha256:2ddaa4f176408604f7c7f2a615516c650ab49560d793f39fbf6928f1ddb8b7f7  0.0s
 => => naming to docker.io/library/docker-react-app_react                                     0.0s

Use 'docker scan' to run Snyk tests against images to find vulnerabilities and learn how to fix them
[+] Running 2/2
 - Network docker-react-app_default    Created                                                0.7s
 - Container docker-react-app-react-1  Created                                                9.0s
Attaching to docker-react-app-react-1
docker-react-app-react-1  |
docker-react-app-react-1  | > docker-react-app@0.1.0 start
docker-react-app-react-1  | > react-scripts start
docker-react-app-react-1  |
docker-react-app-react-1  | (node:25) [DEP_WEBPACK_DEV_SERVER_ON_AFTER_SETUP_MIDDLEWARE] DeprecationWarning: 'onAfterSetupMiddleware' option is deprecated. Please use the 'setupMiddlewares' option.
docker-react-app-react-1  | (Use `node --trace-deprecation ...` to show where the warning was created)
docker-react-app-react-1  | (node:25) [DEP_WEBPACK_DEV_SERVER_ON_BEFORE_SETUP_MIDDLEWARE] DeprecationWarning: 'onBeforeSetupMiddleware' option is deprecated. Please use the 'setupMiddlewares' option.
docker-react-app-react-1  | Starting the development server...
docker-react-app-react-1  |
docker-react-app-react-1  | Compiled successfully!
docker-react-app-react-1  |
docker-react-app-react-1  | You can now view docker-react-app in the browser.
docker-react-app-react-1  |
docker-react-app-react-1  |   Local:            http://localhost:3000
docker-react-app-react-1  |   On Your Network:  http://172.18.0.2:3000
docker-react-app-react-1  |
docker-react-app-react-1  | Note that the development build is not optimized.
docker-react-app-react-1  | To create a production build, use npm run build.
docker-react-app-react-1  |
docker-react-app-react-1  | webpack compiled successfully
docker compose를 통한 react app을 실행 시키는데 성공!
07. 리액트 앱 테스트하기
07-1. 로컬 환경에서 리액트 테스트
이번에는 Docker 환경에서 react app을 테스트하기 위한 방법에 대해 알아보자.
우선 로컬에서 node_modules 파일을 지웠기 때문에 현재 테스트가 되지 않는 상황이다.
07-2. 도커 환경에서 리액트 테스트
# 우선 기존 Dockerfile 빌드
docker build -f Dockerfile.dev ./
docker run -it <이미지 이름> npm run test
docker run -it youngmin1085/docker-react-app-demo npm run test
App.js 파일을 원상 복구한 후에 해당 명령어를 실행 해보자.
만약 테스트에 이상이 없는 경우 아래와 같은 화면이 나오게 된다.

07-3. docker-compose 파일 수정
# https://js-development.tistory.com/23
version: "3"
services:
  react:
    build:
      context: .
      dockerfile: Dockerfile.dev
    ports:
      - "3000:3000"
    volumes:
      - /usr/src/app/node_modules
      - ./:/usr/src/app
    environment:
      - CHOKIDAR_USEPOLLING=true
    stdin_open: true # react bug
  tests:
    build:
      context: .
      dockerfile: Dockerfile.dev
    volumes:
      - /usr/src/app/node_modules
      - ./:/usr/src/app
    command: ["npm", "run", "test"]
docker-compose.yml 파일에 test 관련 내용을 추가한다.
$ docker-compose up --build
[+] Building 0.4s (13/16)
 => [docker-react-app_react internal] load build definition from Dockerfile.dev                                                                                                                                                    0.0s
 => => transferring dockerfile: 36B                                                                                                                                                                                                0.0s
 => [docker-react-app_tests internal] load build definition from Dockerfile.dev                                                                                                                                                    0.0s
 => => transferring dockerfile: 203B                                                                                                                                                                                               0.0s
 => [docker-react-app_react internal] load .dockerignore                                                                                                                                                                           0.0s
 => => transferring context: 2B                                                                                                                                                                                                    0.0s
 => [docker-react-app_tests internal] load .dockerignore                                                                                                                                                                           0.0s
 => => transferring context: 2B                                                                                                                                                                                                    0.0s
 => [docker-react-app_tests internal] load metadata for docker.io/library/node:alpine                                                                                                                                              0.0s
 => [docker-react-app_tests 1/5] FROM docker.io/library/node:alpine                                                                                                                                                                0.0s
 => [docker-react-app_react internal] load build context                                                                                                                                                                           0.0s
 => => transferring context: 7.11kB                                                                                                                                                                                                0.0s
 => CACHED [docker-react-app_react 2/5] WORKDIR /usr/src/app                                                                                                                                                                       0.0s
 => CACHED [docker-react-app_react 3/5] COPY package.json ./                                                                                                                                                                       0.0s
 => CACHED [docker-react-app_react 4/5] RUN npm install                                                                                                                                                                            0.0s
 => [docker-react-app_react 5/5] COPY ./ ./                                                                                                                                                                                        0.1s
 => [docker-react-app_tests internal] load build context                                                                                                                                                                           0.1s
 => => transferring context: 2.15MB                                                                                                                                                                                                0.0s
 => [docker-react-app_react] exporting to image                                                                                                                                                                                    0.1s
 => => exporting layers                                                                                                                                                                                                            0.1s
 => => writing image sha256:a294f301d275aa8fce6566d96e9304b8305bda6c806dade6ded7dd26921ed2f0                                                                                                                                       0.0s
 => => naming to docker.io/library/docker-react-app_tests                                                                                                                                                                          0.0s
 => => naming to docker.io/library/docker-react-app_react                                                                                                                                                                          0.0s

Use 'docker scan' to run Snyk tests against images to find vulnerabilities and learn how to fix them
[+] Running 2/2
 - Container docker-react-app-tests-1  Created                                                                                                                                                                                     9.4s
 - Container docker-react-app-react-1  Recreated                                                                                                                                                                                   0.2s
Attaching to docker-react-app-react-1, docker-react-app-tests-1
docker-react-app-tests-1  |
docker-react-app-tests-1  | > docker-react-app@0.1.0 test
docker-react-app-tests-1  | > react-scripts test
docker-react-app-tests-1  |
docker-react-app-react-1  |
docker-react-app-react-1  | > docker-react-app@0.1.0 start
docker-react-app-react-1  | > react-scripts start
docker-react-app-react-1  |
docker-react-app-react-1  | (node:25) [DEP_WEBPACK_DEV_SERVER_ON_AFTER_SETUP_MIDDLEWARE] DeprecationWarning: 'onAfterSetupMiddleware' option is deprecated. Please use the 'setupMiddlewares' option.
docker-react-app-react-1  | (Use `node --trace-deprecation ...` to show where the warning was created)
docker-react-app-react-1  | (node:25) [DEP_WEBPACK_DEV_SERVER_ON_BEFORE_SETUP_MIDDLEWARE] DeprecationWarning: 'onBeforeSetupMiddleware' option is deprecated. Please use the 'setupMiddlewares' option.
docker-react-app-tests-1  | PASS src/App.test.js
docker-react-app-tests-1  |   ✓ renders learn react link (51 ms)
docker-react-app-tests-1  |
docker-react-app-tests-1  | Test Suites: 1 passed, 1 total
docker-react-app-tests-1  | Tests:       1 passed, 1 total
docker-react-app-tests-1  | Snapshots:   0 total
docker-react-app-tests-1  | Time:        1.381 s
docker-react-app-tests-1  | Ran all test suites.
docker-react-app-tests-1  |
docker-react-app-react-1  | Starting the development server...
docker-react-app-react-1  |
docker-react-app-react-1  | Compiled successfully!
docker-react-app-react-1  |
docker-react-app-react-1  | You can now view docker-react-app in the browser.
docker-react-app-react-1  |
docker-react-app-react-1  |   Local:            http://localhost:3000
docker-react-app-react-1  |   On Your Network:  http://172.18.0.3:3000
docker-react-app-react-1  |
docker-react-app-react-1  | Note that the development build is not optimized.
docker-react-app-react-1  | To create a production build, use npm run build.
docker-react-app-react-1  |
docker-react-app-react-1  | webpack compiled successfully
테스트까지 정상적으로 확인.
08. 운영환경 도커 이미지를 위한 Dockerfile 작성하기
08-1. Dockerfile 생성
# Builder Stage
FROM node:alpine as builder
WORKDIR '/usr/src/app'
COPY package.json .
RUN npm install
COPY ./ ./
RUN npm run build

# Run Stage
FROM nginx
COPY --from=builder /usr/src/app/build /usr/share/nginx/html
docker run -d -p 8080:80 youngmin1085/docker-react-nginx
http://localhost:8080
해당 URL에 접속하면 기존과 마찬가지로 react app 화면을 출력된다.
또한 개발자 도구를 통해 현재 Nginx 서버가 앞딴에 떠 있는것도 확인이 가능하다.


댓글남기기