
[Docker] 기본적인 도커 클라이언트 명령어
📌 Topic
- 이미지로 컨테이너 만들기
- C-group, 네임스페이스를 도커 환경에서 쓸 수 있는 이유
- 도커 이미지 내부 파일 구조 보기
- 컨테이너들 나열하기
- Docker 컨테이너의 생명주기
- Docker Stop vs Docker Kill
- 컨테이너 삭제하기
- 실행 중인 컨테이너에 명령어 전달
- 레디스를 이용한 컨테이너 이해
- 실행 중인 컨테이너에서 터미널 생활 즐기기
01. 이미지로 컨테이너 만들기
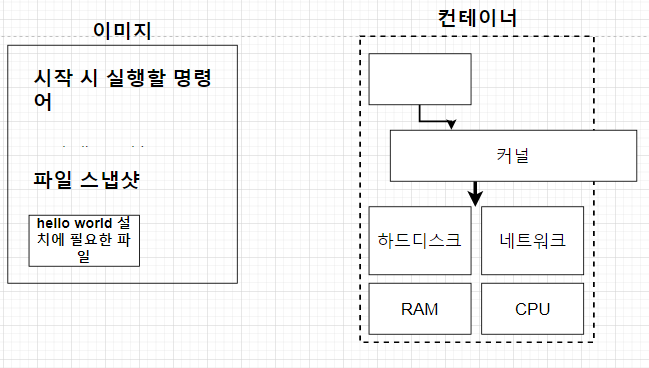
이번 시간에는 도커(Docker) 이미지가 어떻게 컨테이너로 만들어지는지 확인 해보자. 중요한 부분은 이미지 안에는 실행 시 시작될 명령어와, 파일 스냅샷이 존재한다는 점.
01-1. 이미지
이미지는 응용 프로그램을 실행하는 데 필요한 모든 것을 포함하고 있다.
01-2. 실제 실행을 위해 필요한 부분
- 시작 시 실행이 될 명령어(run kakaotalk)
- 파일 스냅샷(카카오톡 파일)
01-3. 이미지를 컨테이너로 만드는 순서
❯ docker run hello-world # run 명령어를 통해 image를 컨테이너화 시킴

Hello from Docker!
This message shows that your installation appears to be working correctly.

To generate this message, Docker took the following steps:
 1. The Docker client contacted the Docker daemon.
 2. The Docker daemon pulled the "hello-world" image from the Docker Hub.
    (amd64)
 3. The Docker daemon created a new container from that image which runs the
    executable that produces the output you are currently reading.
 4. The Docker daemon streamed that output to the Docker client, which sent it
    to your terminal.

To try something more ambitious, you can run an Ubuntu container with:
 $ docker run -it ubuntu bash

Share images, automate workflows, and more with a free Docker ID:
 https://hub.docker.com/

For more examples and ideas, visit:
 https://docs.docker.com/get-started/
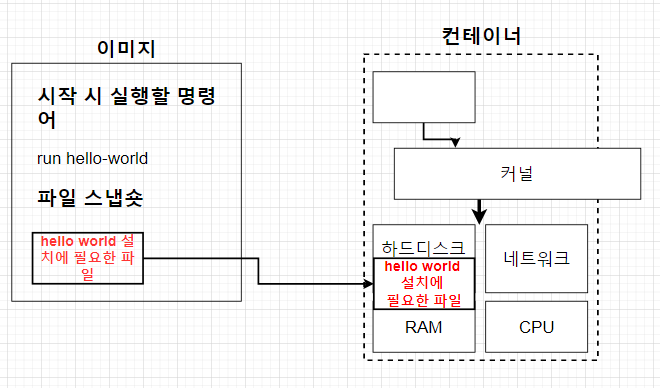
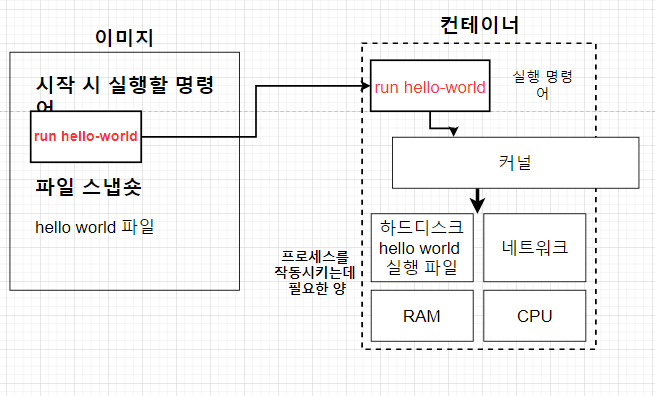
도커(Docker) 이미지 안에는 시작 시 실행 될 명령어와, 파일 스냅샷이 존재한다.
- Docker 클라이언트에서 docker run <이미지명> 을 입력한다
- 위 명령어 입력 시 도커 이미지에 있는 파일 스냅샷은 컨테이너 안의 H/D에 옮겨진다
- 후에 시작 시 실행할 명령어가 커널 위의 빈칸으로 이동 되고 해당 명령어가 실행이 된다
02. Cgroup과 Namespace
- 컨테이너를 격리 시킬 수 있는 이유는 Cgroup과 Namespace를 사용하기 때문이다
- 하지만 이러한 Cgroup, Namespace는 Linux(리눅스)에서 사용이 되는 기술인데?
02-1. Docker 환경 확인
$ docker version
Client: Docker Engine - Community
 Cloud integration: v1.0.25
 Version:           20.10.16
 API version:       1.41
 Go version:        go1.17.10
 Git commit:        aa7e414
 Built:             Thu May 12 09:17:39 2022
 OS/Arch:           linux/amd64 # 이 부분
 Context:           default
 Experimental:      true

Server: Docker Desktop
 Engine:
  Version:          20.10.16
  API version:      1.41 (minimum version 1.12)
  Go version:       go1.17.10
  Git commit:       f756502
  Built:            Thu May 12 09:15:42 2022
  OS/Arch:          linux/amd64 # 이 부분
  Experimental:     false
 containerd:
  Version:          1.6.4
  GitCommit:        212e8b6fa2f44b9c21b2798135fc6fb7c53efc16
 runc:
  Version:          1.1.1
  GitCommit:        v1.1.1-0-g52de29d
 docker-init:
  Version:          0.19.0
  GitCommit:        de40ad0
- 현재 Window를 사용하고 있는데 OS/Arch를 보면 linux/amd64로 설정이 되어있다
- 심지어 Mac에서 테스트 해본 결과 동일한 결과를 출력하고 있다
- 어떻게 이러한 환경이 구성이 되는 것일까?
02-2. 내부 메커니즘 확인
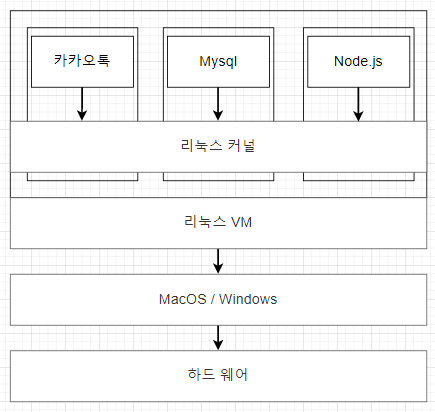
- 우리의 데스크톱은 Window, MacOS이지만 도커는 실제로 리눅스 VM 위에서 돌아간다
- Host OS 위에 존재 하였던 Docker Engine 영역을 한 번 떠올리면 좋을 것 같다
03. 도커 이미지 내부 파일 구조 보기
$ docker run <image name> ls
- 기본적으로 Docker Image를 실행하는 커멘드는 위와 같다
- docker
- 도커 클라이언트 언급
- run
- 컨테이너 생성 및 실행
- image name
- 해당 컨테이너를 위한 이미지명
- ls
- 해당 자리는 이미지가 가지고 있는 실행 시 시작 명령어를 무시하고 해당 커멘드를 실행
$ docker run alpine ls
Unable to find image 'alpine:latest' locally
latest: Pulling from library/alpine
2408cc74d12b: Already exists
Digest: sha256:686d8c9dfa6f3ccfc8230bc3178d23f84eeaf7e457f36f271ab1acc53015037c
Status: Downloaded newer image for alpine:latest
bin
dev
etc
home
lib
media
mnt
opt
proc
root
run
sbin
srv
sys
tmp
usr
var
- docker run을 통해 alpine 이미지를 실행
- 해당 이미지가 캐싱 서버에 없는 경우 도커 허브(Docker Hub)에서 Pulling 한다
- 해당 이미지를 통해 컨테이너를 생성
- 마지막으로 ls 명령어에 의해 파일 리스트가 출력 된다 (내부 이미지 실행 명령어 무시)
그러면 이번에는 Hello-world 이미지를 실행 해보자
$ docker run hello-world ls
docker: Error response from daemon: failed to create shim task: OCI runtime create failed: runc create failed: unable to start container process: exec: "ls": executable file not found in $PATH: unknown.
ERRO[0000] error waiting for container: context canceled
- hello-world 이미지 안에는 문장만 존재할 뿐 ls를 실행하기 위한 패키지가 존재하지 않음
- 이러한 이유로 인해 위와 같은 에러가 발생한다
- 즉, 파일 스냅샷에 따라 사용할 수 있는 명령어가 있고 그렇지 않은 명령어가 존재한다
04. 컨테이너들 나열하기
이번 시간에는 컨테이너들을 나열하는 명령어(command)에 대해 알아보자. 나열이라고는 했는데, 컨테이너 프로세스 목록을 확인하기 위한 커멘드를 알아보자는 의미다.
04-1. 현재 실행중인 컨테이너 나열
$ docker ps
CONTAINER ID   IMAGE     COMMAND   CREATED   STATUS    PORTS     NAMES
- 현재는 실행되고 있는 컨테이너가 존재하지 않는 상태
- docker
- 도커 클라이언트 언급
- ps
- 프로세스 상태(status)
04-2. 컨테이너 실행 후 프로세스 확인
# Run docker image and check network traffic localhost
$ docker run alpine ping localhost
PING localhost (127.0.0.1): 56 data bytes
64 bytes from 127.0.0.1: seq=0 ttl=64 time=0.026 ms
64 bytes from 127.0.0.1: seq=1 ttl=64 time=0.035 ms
64 bytes from 127.0.0.1: seq=2 ttl=64 time=0.037 ms
64 bytes from 127.0.0.1: seq=3 ttl=64 time=0.045 ms
64 bytes from 127.0.0.1: seq=4 ttl=64 time=0.056 ms
64 bytes from 127.0.0.1: seq=5 ttl=64 time=0.037 ms
64 bytes from 127.0.0.1: seq=6 ttl=64 time=0.036 ms
64 bytes from 127.0.0.1: seq=7 ttl=64 time=0.036 ms
64 bytes from 127.0.0.1: seq=8 ttl=64 time=0.034 ms
64 bytes from 127.0.0.1: seq=9 ttl=64 time=0.036 ms
64 bytes from 127.0.0.1: seq=10 ttl=64 time=0.039 ms
# docker process check
$ docker ps
CONTAINER ID   IMAGE     COMMAND            CREATED          STATUS          PORTS     NAMES
7d06c39bfeee   alpine    "ping localhost"   14 seconds ago   Up 13 seconds             dazzling_gould
- CONTAINER ID
- 컨테이너의 고유한 ID 해쉬값(Hash Value)
- IMAGE
- 사용된 이미지명
- COMMAND
- 컨테이너 시작 시 실행된 명령어, 대부분 이미지에 내장 되어 있기에 별도 설정 필요 없음
- CREATED
- 컨테이너가 생성 시간
- STATUS
- 컨테이너 상태(Up, Exited, Pause)
- PORTS
- 컨테이너가 개방한 포트와 호스트에 연결한 포트
- NAMES
- 컨테이너의 고유한 이름
- 컨테이너 생성 시 —name 옵션으로 이름 설정이 가능
- 따로 설정하지 않을 시 도커 엔진이 해당 이름을 설정
04-3. 원하는 항목만 출력
$ docker ps --format 'table' # Name만 출력
$ docker ps --format 'table\t table' # Name, Image만 출력
$ docker ps -a # 모든 컨테이너(실행되지 않은 컨테이너도) 확인
05. 도커 컨테이너의 생명주기
도커 컨테이너의 생명 주기란 컨테이너가 생성, 시작, 실행, 중지되고 삭제되기 까지의 과정을 의미한다.
05-1. 생명 주기
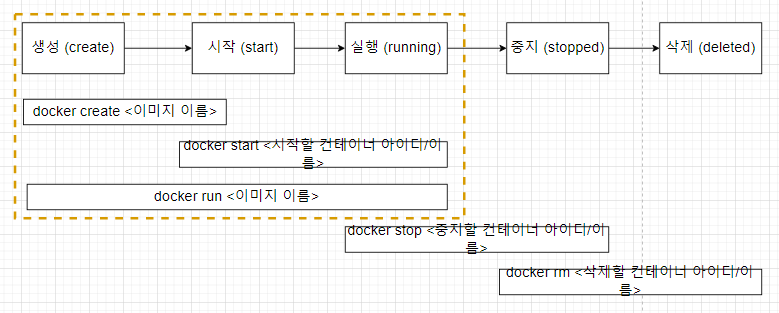
이번 시간에는 도커 컨테이너의 생성부터 실행까지의 대한 생명주기를 살펴보자.
$ docker create <image name> # 이미지 생성
$ docker start <image name> # 이미지 시작 -> 컨테이너화
$ docker run <image name> # create + start
# 이미지 기반 컨테이너 생성
$ docker create hello-world
0b4149270d24de7e49cec93f57b849874bad35ea25b1122e14f32eeb859df250 # 고유한 Hash
# 고유한 ID를 갖는 컨테이너 실행
# -a : attach
$ docker start -a 0b4149270d24de7e49cec93f57b849874bad35ea25b1122e14f32eeb859df250

Hello from Docker!
This message shows that your installation appears to be working correctly.

To generate this message, Docker took the following steps:
 1. The Docker client contacted the Docker daemon.
 2. The Docker daemon pulled the "hello-world" image from the Docker Hub.
    (amd64)
 3. The Docker daemon created a new container from that image which runs the
    executable that produces the output you are currently reading.
 4. The Docker daemon streamed that output to the Docker client, which sent it
    to your terminal.

To try something more ambitious, you can run an Ubuntu container with:
 $ docker run -it ubuntu bash

Share images, automate workflows, and more with a free Docker ID:
 https://hub.docker.com/

For more examples and ideas, visit:
 https://docs.docker.com/get-started/
우리는 이전에 docker run
docker create를 하면 파일 스냅샷이 H/D 영역에 위치하고 이미지를 기반으로 하여 컨테이너가 생성이 된다.
docker start를 하면 이미 만들어진 컨테이너를 실행하게 되는데 여기서 시작 시 실행할 명령어가 커널 위에 위치하고 해당 커멘드가 실행 된다.
06. Docker Stop vs Docker Kill
이전 시간에는 create, start 도커 생명 주기에 대해 간략히 알아보고 실습을 진행 하였다. 이번 시간에는 중지(Stopped), 삭제(Removed) 생명주기에 대해 간략히 알아보자.
06-1. 도커 생명 주기에서 중지와 삭제
# stop을 통한 ps 종료
$ docker stop 3fefaec0dfc1
3fefaec0dfc1
- 도커(Docker) Stop의 경우 Graceful하게 프로세스를 중지 시킨다
- 이전에 하던 작업들을 모두 완료한 후에 해당 프로세스를 중지 시킨다는 의미
- SigTerm이 존재한다
# kill을 통한 ps 종료
$ docker kill 39587fd9e2b7
39587fd9e2b7
- 도커(Docker) Kill의 경우 기다리지 않고 해당 프로세스를 바로 종료 시킨다
- Linux를 자주 접하고 있는 지금, kill 명령어는 항상 조심해야 하는 명령어
- SigTerm이 존재하지 않는다
07. 도커 컨테이너 삭제하기
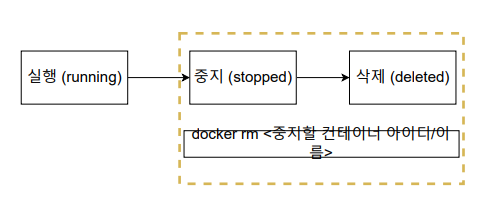
docker rm <아이디/이름>
Docker Container 삭제를 위한 CMD는 위와 같다
또한 실행중인 컨테이너는 먼저 중지한 후에 삭제가 가능하다.
docker ps -a
CONTAINER ID   IMAGE          COMMAND                  CREATED      STATUS                    PORTS                   NAMES
39587fd9e2b7   alpine         "ping localhost"         5 days ago   Exited (137) 5 days ago                           confident_heyrovsky
3fefaec0dfc1   alpine         "ping localhost"         5 days ago   Exited (137) 5 days ago                           pedantic_kapitsa
0b4149270d24   hello-world    "/hello"                 5 days ago   Exited (0) 5 days ago                             angry_moser
7d06c39bfeee   alpine         "ping localhost"         5 days ago   Exited (0) 5 days ago                             dazzling_gould
ac7e0ce13dc7   hello-world    "ls"                     5 days ago   Created                                           busy_boyd
c62fbae1e877   alpine         "/bin/sh"                5 days ago   Exited (0) 5 days ago                             serene_volhard
2750aa0954cd   alpine         "ls"                     5 days ago   Exited (0) 5 days ago                             boring_matsumoto
0ce575922ff4   hello-world    "/hello"                 5 days ago   Exited (0) 5 days ago                             dazzling_joliot
c7fa9c9bf59e   hello-world    "/hello"                 6 days ago   Exited (0) 6 days ago                             sad_sammet
5cd4cb798eab   hello-world    "/hello"                 6 days ago   Exited (0) 6 days ago                             dazzling_johnson
70923ac80442   hello-world    "/hello"                 6 days ago   Exited (0) 6 days ago                             vigorous_knuth
e7a71952863a   nginx:latest   "/docker-entrypoint.…"   9 days ago   Exited (255) 7 days ago   0.0.0.0:49153->80/tcp   nginx-fVha
24179d038d09   alpine/git     "git clone https://g…"   9 days ago   Exited (0) 9 days ago                             repo
39587fd9e2b7라는 ID를 갖는 컨테이너를 삭제 해보자
docker rm 39587fd9e2b7
위와 같이 rm를 사용하면 컨테이너 제거가 가능하다.
만약 한꺼번에 모든 컨테이너를 지우고 싶은경우 아래 명령어를 사용하면 된다.
# 모든 컨테이너 삭제
docker rm `docker ps -a -q`
3fefaec0dfc1
0b4149270d24
7d06c39bfeee
ac7e0ce13dc7
c62fbae1e877
2750aa0954cd
0ce575922ff4
c7fa9c9bf59e
5cd4cb798eab
70923ac80442
e7a71952863a
24179d038d09

# 이미지 삭제
docker rmi <이미지 id>
위 명령어를 사용하면 모든 컨테이너 삭제가 가능하다.
하지만 이것도 실행중인 컨테이너에는 영향을 주지 않는다.
docker system prune
WARNING! This will remove:
  - all stopped containers
  - all networks not used by at least one container
  - all dangling images
  - all dangling build cache
- 실행중인 컨테이너까지 모두 삭제
08. 실행중인 컨테이너에 명령어 전달
지금까지는 컨테이너를 실행할 때 명령어를 전달 하였는데 이제는 컨테이너를 먼저 실행하고 후에 명령어를 전달하는 방식을 알아보자.
08-1. 실행중인 컨테이너에 명령어를 전달하고 싶다면?
docker exec <컨테이너 아이디>
docker exec e96e53bbfd4e
- docker run 은 새로 컨테이너를 만들어서 실행하는 것
- docker exec 은 이미 실행중인 컨테이너에 명령어를 전달하는 것
09. 레디스를 이용한 컨테이너의 이해
이번 시간에는 레디스를 도커 환경에서 실행하여
컨테이너를 더욱 더 이해하는 시간을 가져보자.
우선 레디스를 실행하는 과정은 다음과 같다.
아래 사진을 참고하여 진행 해보자.
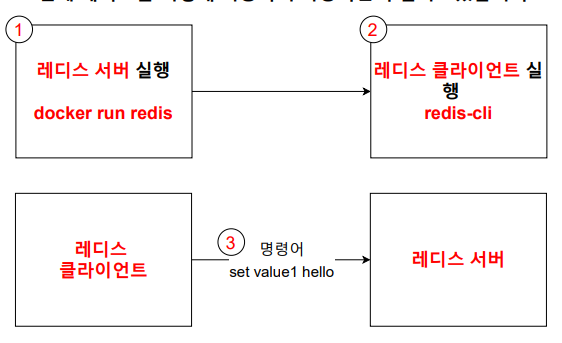
참고 : 레디스 서버가 먼저 작동을 하고 있어야 한다
- 레디스 서버 실행
- 레디스 클라이언트 실행 (redis-cli)
- 레디스 클라이언트를 통해 레디스 서버에 명령어 전달
- 레디스 서버가 해당 명령어를 처리
09-1. redis 이미지 다운로드
# redis 이미지 다운로드
docker run redis
해당 명령어를 통해 redis 이미지를 허브에서 내려받는다.
하지만 만약 로컬에 redis 이미지가 있는 경우 해당 이미지가 실행이 된다.
후에 redis-cli를 사용해야 하는데 현재 첫 번재 터미널에서는
명령어가 입력되지 않기에 또 다른 터미널을 열어 실습을 진행 해보자.
09-2. redis-cli 실행
# 또 다른 터미널에서 진행
redis-cli
zsh: command not found: redis-cli
또 다른 터미널을 열어 해당 명령어를 입력 한다.
하지만 다음과 같은 명령어가 출력이된다.
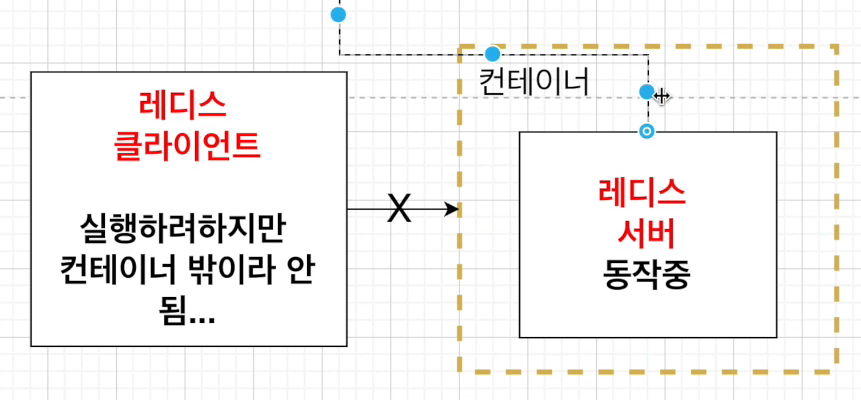
이러한 문제가 발새하는 이유는 redis-cli를
레디스 서버가 있는 컨테이너 밖에서 실행을 하려 했기 때문이다.
이러한 문제를 해결하기 위해서는
레디스 클라이언트(redis-cli)도 컨테이너 안에서 실행을 시켜야 한다.
09-3. redis 서버(컨테이너) 접근 후 조작
docker ps
CONTAINER ID   IMAGE     COMMAND                  CREATED          STATUS          PORTS      NAMES
65000182acba   redis     "docker-entrypoint.s…"   10 minutes ago   Up 10 minutes   6379/tcp   affectionate_hodgkin
- 현재 사용이 되고 있는 redis 컨테이너 상태 확인
docker exec -it 65000182acba redis-cli
127.0.0.1:6379>
- docker exec
- 현재 실행중인 컨테이너에 어떠한 명령어를 전달
- 65000182acba(redis container)에 redis-cli 명령어를 전달한 상황
- -it
- 해당 옵션이 있어야 redis-cli를 키고 명령어를 이어나갈 수 있다
- 해당 옵션이 없으면 redis-cli를 키고 바로 나오게 된다
127.0.0.1:6379> set key1 hello
OK
127.0.0.1:6379> get key1
"hello"
- redis-cli에서 간단한 명령어 수행
- redis는 key-value 구조
10. 실행중인 컨테이너에서 터미널 생황 즐기기
이번 시간에는 실행중인 컨테이너에 쉘이나 터미널 환경으로 접속하는 방법을 알아보자.
docker exec -it 974dd33d4754 sh
마지막에 sh를 붙혀주면 일일이 docker exec -it를 입력하지 않아도
해당 컨테이너에 붙어서 바로바로 사용이 가능하다.
댓글남기기